16 切換到 32-bit mode
電腦一開機我們是在 16-bit mode 裡,為了能使用更多 memory 以及各種 CPU 強大的功能,我們要切換到 32-bit mode。
首先要暫停 interrupt handling,因為 interrupt handling 在 16-bit mode 跟 32-bit mode 的實作方式完全不一樣。暫停 interrupt handling 的方式是使用 cli instruction,它會 clear interrupt flag。
接著告訴 CPU 我們設好的 GDT 在哪裡:
1 | lgdt [gdt_descriptor] |
最後透過 set control register cr0 的第一個 bit 做 mode switch。我們無法直接 set cr0,要先把它的 value load 到 generral register,set bit 再 store 回 cr0:
1 | mov eax, cr0 |
cr0 update 之後,CPU 就是在 32-bit mode 了。
要注意現代的 CPU 都有 pipeline 機制,可以同時做 instruction 不同 stage。例如每個 instruction 要先從 memory fetch,接著 decode,再 execute,最後 store 回 memory。因為這四個階段是可以獨立運作的,所以他們可以在同一個 CPU cycle、不同 circuitry 同時被執行,例如 execute 目前 instruction 時同時 fetch
下一個 instruction。
一般使用 CPU 不需要考慮 CPU 內部 pipeline 的問題,但在 switch CPU mode 時就要注意,不然可能會有些 stage 在錯誤的 mode 中執行。
我們要做的是在切換到 32-bit mode 後,立刻強制 CPU 結束所有在 pipeline 中的工作。我們利用 jump 到很遠的 code 的方式來達到強制 CPU 結束所有正在 pipeline 中的工作。這麼做的原理是因為 CPU 在 pipeline 的運作下會 pre-fetch instruction 來知道下一個 instruction 是什麼,但像是 jmp 或 call instruction 就會讓 CPU 無法知道下一個 instruction 是什麼,進而達到 flush CPU pipeline 的作用。
要做一個很遠的 jump,要額外提供 target segment,如下:
1 | jmp <segment>:<address offset> |
https://github.com/cjwind/mini-os/tree/main/bootsect 這裡有完整的從 16 bit mode 進到 32 bit mode 的 boot sector 程式,成功組譯執行可以看到以下畫面:
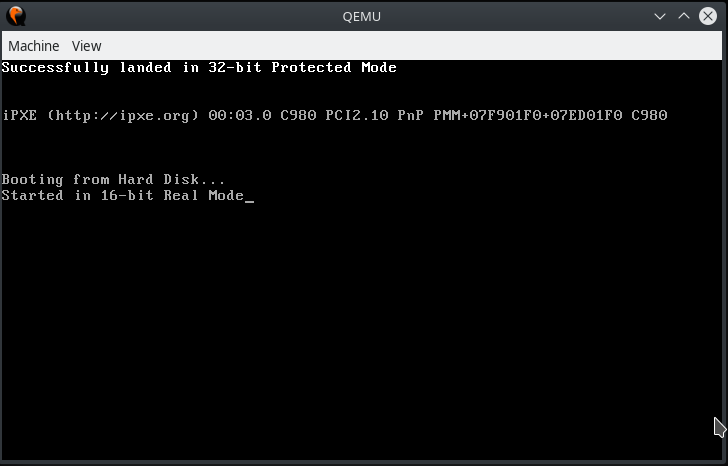
要注意的是 32 bit mode 在印東西時會從左上角開始印,這是因為我們直接把值寫在 video memory,沒有特別計算顯示字元的位置。