09 nasm include file
nasm 可以 include file,如下所示:
1 | %include "print.asm" ; will be replaced by content of the file |
nasm 可以 include file,如下所示:
1 | %include "print.asm" ; will be replaced by content of the file |
在 CPU 的層級,call function 就是 jump 到 routine 的 address 再 jump 回原本所在的 address 繼續執行。
caller 跟 callee 會說好要怎麼傳參數,例如放在某個 register。
caller 的 address 也需要被儲存,這樣 callee 執行完才能回到 caller 繼續執行。CPU 以 register ip 記錄目前要執行的 instruction 的 address,但是我們不能直接 access register ip。
CPU 提供兩個 instruction 來 call function:call 與 ret。call 會將 caller 的 address push 到 stack 接著 jump 到 callee 執行,ret 則會從 stack pop 出 address 並 jump 回到 caller 繼續執行。
接下來我們要考慮的是 register 的內容可能會被 callee 修改,那麼如何在 callee 執行結束後回到 caller 時 register 能夠有原本 caller 所擁有的值?
callee 可以將所有它用到的 register 在開始執行任何工作前先 push 進 stack,等到要 return 回 caller 前再全部 pop 回 register,這樣 caller 繼續執行時在 register 裡就有原本它所使用的值。
為了方便,CPU 提供兩個 instruction 能夠一次 push / pop 所有 register 的值到 stack:pusha 以及 popa。
就是 jump。
jump 有 unconditional jump 跟 conditional jump。
conditional jump 會配合 comparison instruction 使用,例如:
1 | cmp ax, 3 |
等同:
1 | if (ax == 3) { |
comparison instruction 在比較後會設置 flags register 的值,接著 conditional jump instruction 就能依照 flags register 的內容決定要跳到哪執行。
對於 cmp x, y,conditional jump 有以下幾種:
1 | je target ; jump if equal (x == y) |
將產生某種類物件的邏輯跟動作包成一個 class。
這樣的 class 為一個 factory class,它的 method 依據 input 產生出對應的具體 object。如果要新增不同的物件只需修改該 method。
1 | class Factory { |
如果要增加 OperateMul 表示乘法,只需要加一個 class OperateMul 並且在 Factory::createOperate() 的 switch 增加一個 case 即可。這樣增加乘法完全不會動到加法及減法。
Go 的 slice 可以看成一個帶有一些資訊及指向底層 array 指標的 struct。append() 會依照底層 array 擁有的空間以及空間擴張演算法決定是否 allocate 一塊新的 array 來當底層 array。
以下用兩個例子顯示有時候 append() 會 allocate 新的底層 array,有時不會。
1 | func main() { |
執行結果:
1 | x = [0 0 0 0 0] |
這個例子可以看到 append 後的 y 底層的 array 已經跟 x 底層的 array 不同。
再來看看底層 array 相同的例子:
1 | func main() { |
執行結果:
1 | x = [0 0 0] |
從結果可以看到,當把 x[0] 設為 123 時 y[0] 也變成 123,表示 x 與 y 的底層 array 是相同的。
我們不知道 append() 操作後,是否會重新分配 array。因此不能假設 append() 操作後產生的 slice 跟原本的 slice 是同一個,通常會寫成:
1 | nums = append(nums, x) |
CPU 提供兩個指令 push 以及 pop,讓我們可以方便的塞東西進 stack 以及從 stack 拿東西出來。
在 16-bit mode 中,我們要以 16 bit 為單位 push / pop 東西至 stack。
stack 由兩個特殊的 register 實作:bp 與 sp。它們分別記錄 stack 的 base(stack 底部)以及 stack top。
stack 長的方向不是「往上」(memory address 增加),而是「往下」(memory address 減少)。也就是如果我們一開始將 stack base 設在 0x8000,push 一個值後,sp 會是 0x8000 - 0x2 = 0x7ffe。之所以是減 0x2 是因為一次 push 的 element 的大小是 16 bit。
由下面的例子可以確認 stack 的增長方向是往 memory address 小的地方:
1 | mov ah, 0x0e |
中間 pop 之所以要先 pop 至 bx 再從 bl 中拿值放到 al 印出,是因為 pop 出來的 size 是 16 bit,而其中有內容(字元的 ASCII code)是低位的部份,高位部份會是 0。
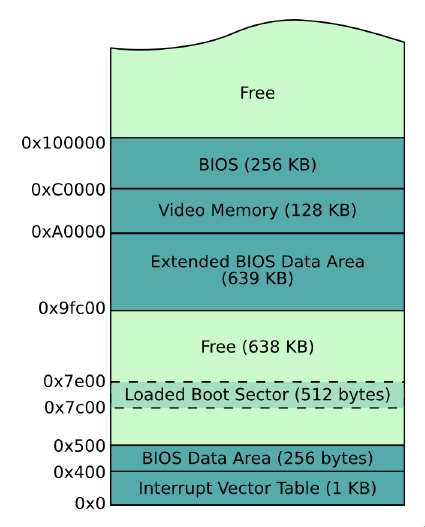
程式要在 memory 裡才能執行,那麼我們寫在 boot sector 裡的程式,也是被 BIOS load 到 memory 中的某個地方才得以執行的。
這個位置在 0x7c00,也就是 BIOS 會將 boot sector 的內容 load 到 memory 0x7c00 位置的地方。
以下是開機後的 memory layout:
接下來希望可以印出放在 memory 內的資料。
我們用些方式來嘗試印印看:
1 | mov ah, 0x0e |
label 表示從 code 一開始到該位置的 offset,the_secret 的值即是從 code 最開始到該位置的 offset。
[bx] 是是去 bx register 內容所代表的的 memory address 拿資料,例如 bx 的值是 0x1e,則 [bx] 就會是 memory address 0x1e 位置上的值,而非這段 code 被 load 到的 memory address 再加上 offset。
最後只有第三種方式可以成功印出 X,這印證了 boot sector 確實被 load 到 memory 0x7c00 的位置。
既然 BIOS 會把 boot sector load 到 0x7c00,這表示對每個 label 我們都要自己加上 0x7c00 才能得到正確的 address。每次要在 offset 加上 0x7c00 也太麻煩,所以可以在最開頭加上以下指令,就能表示「這段 code 預期會被 load 到 memory 哪個位置」,也就不用自己手動加:
1 | [org 0x7c00] |
加上這行後,就會是第二種方式印出 X 了。
定義 string 需要知道關於 string 的兩件事:
前者可以用 label,如下所示:
1 | my_string: |
my_string 就是 string Hello World 的 memory address。指令 db 是 declare byte(s) of data 的意思,也就是直接將這幾個 byte 寫進 binary output file,而不要把它們當作 instruction。
那麼如何知道 string 的長度呢?
一種 convention 是定義 null-terminating string,也就是在 string 結尾加上一個 byte,其值為 0,像這樣:
1 | my_string: |
這樣在處理 string 時,只要遇到值為 0 的 byte 就知道 string 結束了。
我們要利用 BIOS 提供的功能來在螢幕上印出 Hello World。(如果沒有 BIOS,這個工作會變得很困難,因為有很多種不同的螢幕,每個螢幕的硬體跟 interface 都不相同…)
那我們要怎麼使用 BIOS 的功能呢?
這就要說到 interrupt。
interrupt 是個讓 CPU 暫時停下手上正在做的事、轉去做比較優先的事再回來繼續的機制。interrupt 可以由 software 發出,也可由 hardware device 發出。
每個 interrupt 以一個數字表示,這個數字是 interrupt vector 的 index。interrupt vector 是個由 BIOS 初始化的 table,裡面記錄著指向 interrupt service routine (ISR) 的 address pointer。一個 ISR 就是一段處理特定 interrupt 的 machine code。
那麼,BIOS 在 interrupt vector 中放了一些 ISR,每個 ISR 表示某些部份的功能,例如 0x10 跟螢幕有關、0x13 則跟 disk 有關。
如果為每個 BIOS routine 都指定一個 interrupt,有點浪費,而且 interrupt vector 的大小也是有限的,所以會透過 interrupt 配合 register ax 的值來決定執行哪個 BIOS routine。
印字的方式是使用 INT 0x10(video service 的 interrupt)配合 AL 及 AH register 內的值。register AL 裡放要印的 character,AH 則是放 0x0e(AL 是 AX 的 lower part、AH 則是 higher part)。AH 放 0x0e 表示要 call「將 AL 內容寫到在 tty mode 下寫到螢幕上」的 function。
在這個例子裡,我們只需要設定一次 AH 為 0x0e,因為只有一個 process 在 CPU 上跑,AH 的值不會被亂改。
1 | mov ah, 0x0e ; tty mode |
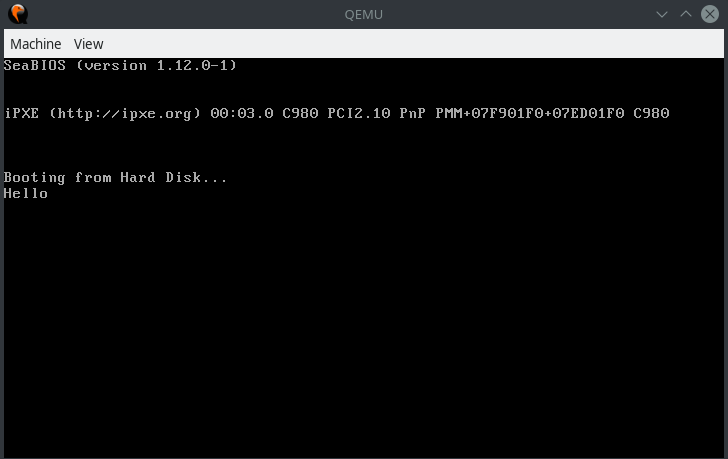
一樣的組譯並執行:
1 | $ nasm -f bin boot_sect_hello.asm -o boot_sect_hello.bin |
會看到像這樣的畫面:
variadic function(可變函式)可用不同數量的參數呼叫,最常見的是 fmt.Printf 系列。
宣告 variadic function 時,在最後一個參數的 type 前面加上 ...,表示這個 function 可以用任意數量的該 type 參數呼叫。
1 | func sum(values ...int) int { |
在此 function 中,values 的 type 是 []int,call sum() 時可以給任意數量的 int:
1 | sum() |
caller 會 implicit 分配 array、複製參數,然後將整個 array 的 slice 傳給 sum()。sum(1, 2, 3) 的行為類似:
1 | values := []int{1, 2, 3} |
參數已經在 slice 中時,以上述方式 call variadic function,即在最後一個參數後面加上 ...。
雖然 ...int 參數在 function 中的行為如同 slice,但是 func f(...int) {} 跟 func g([]int) {} 兩個 function 的 type 是不同的。