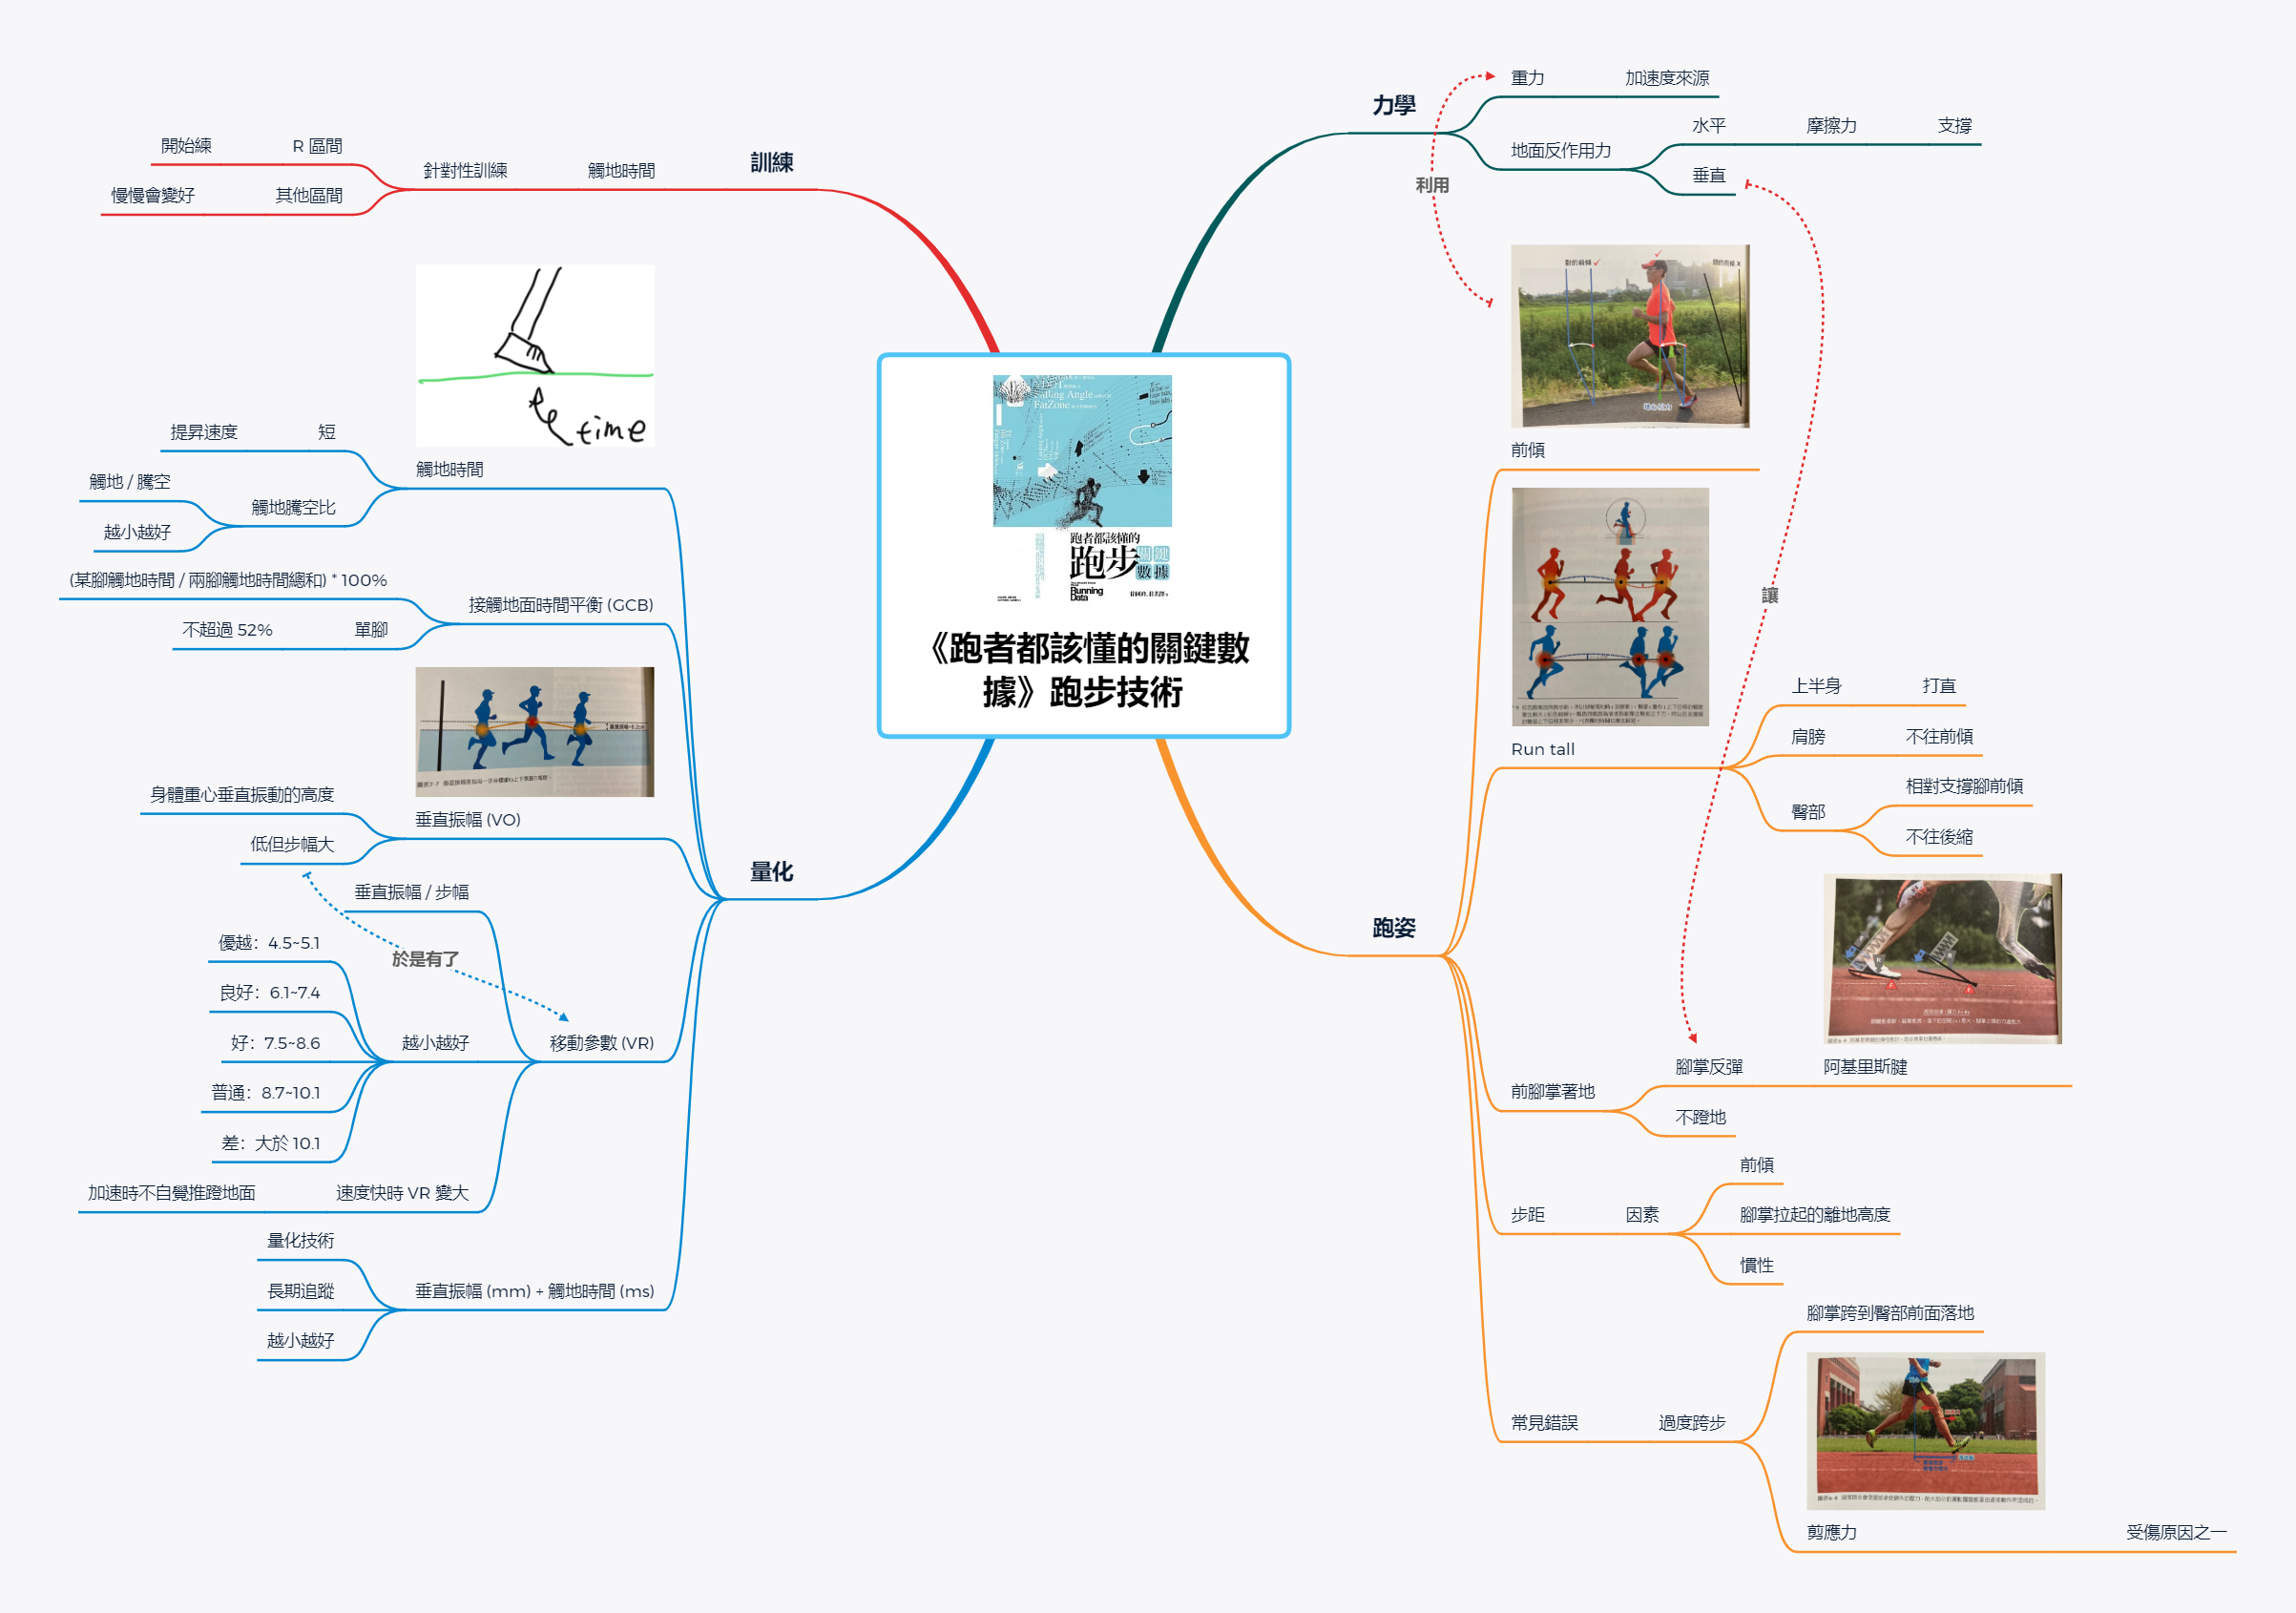
ch3 個人的有氧與訓練能力指標
An API paradigmdefines the interface exposing backend data of a service to otherapplications.
Request-Response API 通常透過 HTTP web server 來公開 interface。
這種 API 會定義一些 endpoints,client 對這些 endpoints 發出 HTTP request 來索取資料,server 則給予 response。response 通常是 JSON 或 XML 格式。
Request-Response API 有三種:
REST is all about resource.
resource 是可以在 web 上被 identify、named、addressed 或 handled 的 entity。
REST API 將資料當成 resource 來 expose 出去,並使用 standard HTTP method 表示 CRUD 的動作。
REST API 遵循的一般規則:
/users/users。一個表示特定元素,例如 /users/U123。/users/U123,而不是 /getUserInfo/U123。GET、POST、UPDATE 跟 DELETE 等 HTTP method 來告訴 server 要執行的動作。POST 建立新 resourceGET 讀取 resourceGET request 永遠不會改變 resource 的狀態,不會有 side effectGET method 有 read-only 的意思GET 是 idempotentPUT 來 replace resource。PATCH 來對現有 resource 做部份 update。RFC 5789DELETE 來刪除現有 resource。盡量用 subresource 表示只屬於其他 resource 的 resource,不要用 top-level resource 表示它,這樣可以讓使用 API 的 developer 知道它們之間的關係。
例如 Github 的 API:POST /repos/:owner/:repo/issues 是在某個人的某個 repository 底下建立一個 issue。
有時候 REST API 需要表示非 CRUD 的操作,常見作法如下:
PATCH /repos/:owner/:repo 然後 data body 是 {"archived": true}。因為 PATCH entry 的 request data body 是 resource 要被更新的欄位,所以才說是以「resource 的部份欄位」來表示動作。PUT /repos/:owner/:repo/issues/:number/lockGET /search/code?q=:query:。REST 跟 resource 有關,RPC 則跟動作(action)有關。
RPC 的 client 會在 server 上執行一段 code。client 通常會傳 method name 跟 argument 給 server,然後得到 JSON 或 XML。
RPC API 通常遵循兩個規則:
GET 是 read-only request,POST 則是其他。當 API 公開的動作比 CRUD 封裝的還要細膩且複雜,或是存在與眼前的「資源」無關的 side effect 時,很適合使用 RPC。RPC style 的 API 也可以配合複雜的 resource model,或針對多種類型的 resource 執行的動作。
RPC style 的 API 除了用 HTTP 外也可以用其他 protocol,包括 Apache Thrift 跟 gRPC。
GraphQL 可以讓 client 端定義需要的 data structure,讓 server 以那個 structure 回傳資料。例如以下是送給 Github API 的 GraphQL query 及其 response:
1 | { |
response:
1 | { |
GraphQL 只需要一個 URL endpoint,而且不需要用不同的 HTTP verb 描述操作,只要在 JSON 內容中寫要做的動作就可以了。
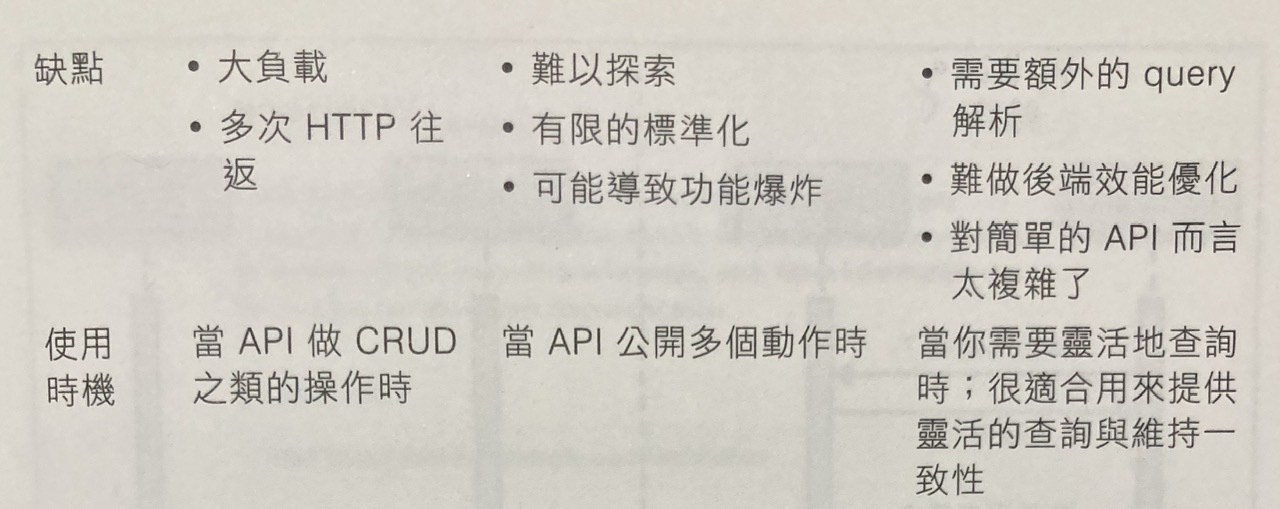
跟 REST 及 RPC 比起來,GraphQL 的優點:
對提供 GraphQL API 的提供者來說,GraphQL 增加了複雜性,server 需要做額外的工作來解析複雜的 query 跟驗證參數。最佳化 GraphQL query 的效能也很麻煩。

如果 service 的資料常常會改變,用 request-response API 的作法 response 很快會過時,這時候使用 API 的 developer 通常會以 polling 來確保得到最新的資料。但如果 polling 頻率太低,可能會在需要即時更新的狀況下無法即時更新 。而 polling 頻率太高則會浪費資源,因為大部分 request 都不會有新資料。
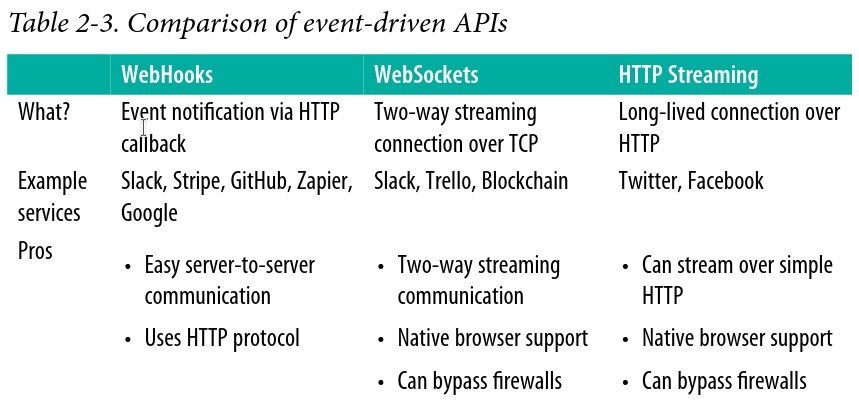
要即時分享 event 資料,有三種方式:WebHook、WebSocket 跟 HTTP Streaming。
WebHook 是個接收 HTTP POST(或 GET、PUT 或 DELETE)的 URL。 實作 WebHook 的 API provider 會在某些事情發生時 POST 一個訊息給使用者設置好的 URL,例如信用卡授權的 postback。
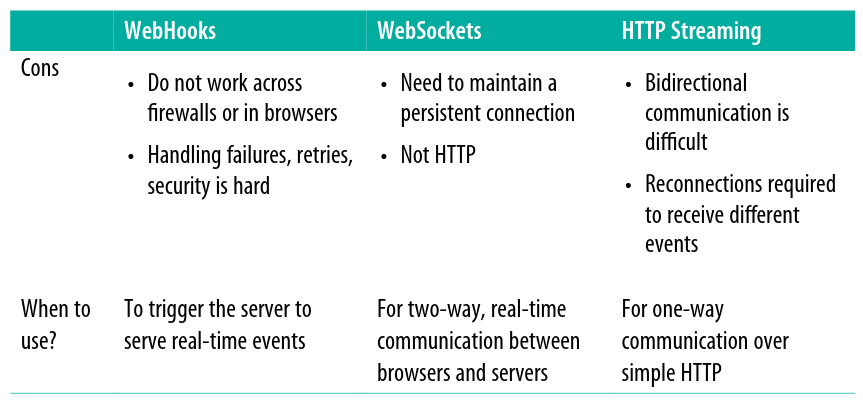
提供 WebHook 會引入的複雜性:
WebSocket is a protocol used to establish a two-way streaming communication channel over a single Transport Control Protocol (TCP) connection.
WebSocket 這個 protocol 通常用在 web client 跟 server 間,有時也會被用來做 server 對 server 的通訊。WebSocket 可以在比較低的 overhead 的情況下開啟 full-duplex 通訊(server 跟 client 可以同時跟對方通訊)。
WebSocket 是運作在 port 80 或 443 上,所以不用在防火牆上另外開 port 來進行連線與通訊。而且使用 WebSocket 也不像 WebHook 得對 internet 打開一個 HTTP endpoint 來接收 event,相對來說比較安全。
WebSocket 適合快速、live 的 streaming 以及長時間(long-lived)的 connection。但不見得適合用在行動裝置或者網路不穩定的地方,因為 client 必須有能力維持 connection,connection 斷了 client 就得重新啟動它。
在 request-response 形式的 HTTP API 裡,client 送出 request 後,會收到一包有限長度的 response。而使用 HTTP Streaming,server 可以透過 client 開啟的 long-lived connection 來持續推送新資料。
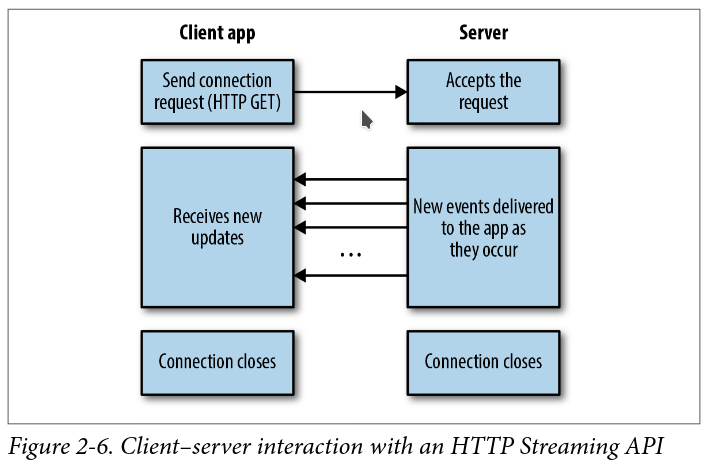
To transmit data over a persistent connection from server to client, there are two options. The first option is for the server to set the Transfer-Encoding header to chunked. This indicates to clients that data will be arriving in chunks of newline-delimited strings. For typ‐ical application developers, this is easy to parse.
Another option is to stream data via server-sent events (SSE). This option is great for clients consuming these events in a browser because they can use the standardized EventSource API.
HTTP Streaming is easy to consume. However, one of the issues with it is related to buffering. Clients and proxies often have bufferlimits. They might not start rendering data to the application until a threshold is met. Also, if clients want to frequently change what kind of events they listen to, HTTP Streaming might not be ideal because it requires reconnections.
沒有一體適用的 API paradigm。每種 API paradigm 只適合特定類型的 use case,所以在實際狀況下有可能需要支援多種 paradigm。
老是失憶……
1 | # 跑起一個 ubuntu container 並且用 foreground 模式進入 bash |
我的 keymap 是 Sublime + Jetbrains 部份按鍵 + 自己設再配 vim 的大雜燴
ctrl + shift + p:執行動作(action)ctrl + p:找檔案ctrl + r:檔案中找 symbolctrl + alt + shift + t:refactor 選單alt + enter:各種神奇功能(?)alt + insert:加入各種 codeshift + f6:renamealt + 1:project browse windowalt + 3:find windowalt + 4:run windowalt + 9:git windowTBC…
Go 從 1.13 開始支援 Go Module,可以在 GOPATH 以外的地方建立 go project 並進行套件管理。一直覺得 source code 只能放在 GOPATH 裡超阿雜…
在 GOPATH 以外的地方建立一個 directory,並且在其中執行 go mod init:
1 | $ mkdir project |
會產生 go.mod 檔案,它會記錄 Go module 與使用的 Go 版本:
1 | module github.com/cjwind/project |
接下來在這個 directory 裡進行開發跟 build 就都一樣,重點是現在 source code 不用非得放在 GOPATH 裡啦~
用 go get 安裝 package 後,會發現在 go.mod 多了一行 require [package] [version],就表示目前使用的 package 及其 version。
另外可能會出現 require [package] [version] // indirect,這表示是我們使用的 package 所需要的 package。
也可以用 go get [package]@[version] 來指定特定的 package version。