今天繼續 import 跟 compute 相關 resource,昨天把 .tf 拆開了,今天直接新增一個 compute.tf 來放 compute resource。(本日程式碼 )
Launch Template launch template 要找到之前 ECS web console 幫我們建立的,名稱會叫 ECSLaunchTemplate_xxxxxxxxx ,用它的 id 來 import:
1
2
3
4
import { to = aws_launch_template.template id = "lt-083d39ffdf2eb11d5" }
generated configuration:
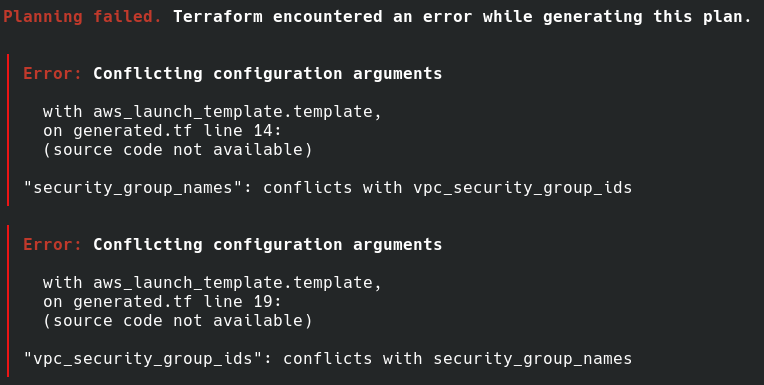
1
2
3
4
5
6
7
8
9
10
11
12
13
14
15
16
17
18
19
20
21
22
23
24
25
resource "aws_launch_template" "template" { default_version = 1 description = null disable_api_stop = false disable_api_termination = false ebs_optimized = null image_id = "ami-0f386dc4885ec169f" instance_initiated_shutdown_behavior = null instance_type = "t3.small" kernel_id = null key_name = "cjw-debian" name = "ECSLaunchTemplate_BuALY8Zexo9F" name_prefix = null ram_disk_id = null security_group_names = [] tags = {} tags_all = {} update_default_version = null user_data = "IyEvYmluL2Jhc2ggCmVjaG8gRUNTX0NMVVNURVI9bXktYXBwID4+IC9ldGMvZWNzL2Vjcy5jb25maWc7" vpc_security_group_ids = [] iam_instance_profile { arn = "arn:aws:iam::xxxxxxx:instance-profile/ecsInstanceRole" name = null } }
這邊有個比較有趣的參數是 user_data ,它的值……看不懂耶?查了 文件 知道它是用 base64 encode 的,我們可以把這個字串貼到 base64 decode 網站 做 decode,就可以看到熟悉的 user data:
1
2
#!/bin/bash echo ECS_CLUSTER=my-app >> /etc/ecs/ecs.config;
依然有 plan error:
根據這個 error,我們把 security_group_names 移除。
EC2 instance 的 IAM role 及 instance profile IAM role 的 import block:
1
2
3
4
import { to = aws_iam_role.ecs_inst id = "ecsInstanceRole" }
generated configuration:
1
2
3
4
5
6
7
8
9
10
11
12
13
resource "aws_iam_role" "ecs_inst" { assume_role_policy = "{\"Statement\":[{\"Action\":\"sts:AssumeRole\",\"Effect\":\"Allow\",\"Principal\":{\"Service\":\"ec2.amazonaws.com\"},\"Sid\":\"\"}],\"Version\":\"2008-10-17\"}" description = null force_detach_policies = false managed_policy_arns = ["arn:aws:iam::aws:policy/service-role/AmazonEC2ContainerServiceforEC2Role"] max_session_duration = 3600 name = "ecsInstanceRole" name_prefix = null path = "/" permissions_boundary = null tags = {} tags_all = {} }
這邊可以看到 IAM role 的 policy 已經在 managed_policy_arns 裡,我們不用另外 import IAM policy。
instance profile 的 import block:
1
2
3
4
import { to = aws_iam_instance_profile.ecs_inst id = "ecsInstanceRole" }
IAM role 跟 instance profile import 完成後,可以把 launch template 裡寫死的 instance profile arn arn:aws:iam::xxxxxxx:instance-profile/ecsInstanceRole 改成使用 instance profile resource 的 attribute:
1
2
3
iam_instance_profile { arn = aws_iam_instance_profile.ecs_inst.arn }
resource aws_iam_instance_profile 內指定的 role 也改用 resource aws_iam_role 的 name attribute:
1 role = aws_iam_role.ecs_inst.name
小技巧:做這種沒有實際修改 resource 的 configuration 的調整後,可以用 terraform plan 看看是不是依然是 No changes,保持 No changes 的話表示這些調整不會真的影響到 resource,算是借用軟體開發中重構(refactor)跟測試(test)的觀念。只是因為真的會去看 cloud 實際的 resource,所以這種「測試」跑起來很慢的。
Auto Scaling Group auto scaling group 一樣是找 ECS 幫我們產生的,名稱會是 Infra-ECS-Cluster-[CLUSTER NAME]-xxxxx-ECSAutoScalingGroup-xxxxx ,根據 文件 ,id 要用 auto scaling group 的 name:
1
2
3
4
import { to = aws_autoscaling_group.asg id = "Infra-ECS-Cluster-my-app-431cf07b-ECSAutoScalingGroup-15CLDY12KK4PC" }
generated configuration:
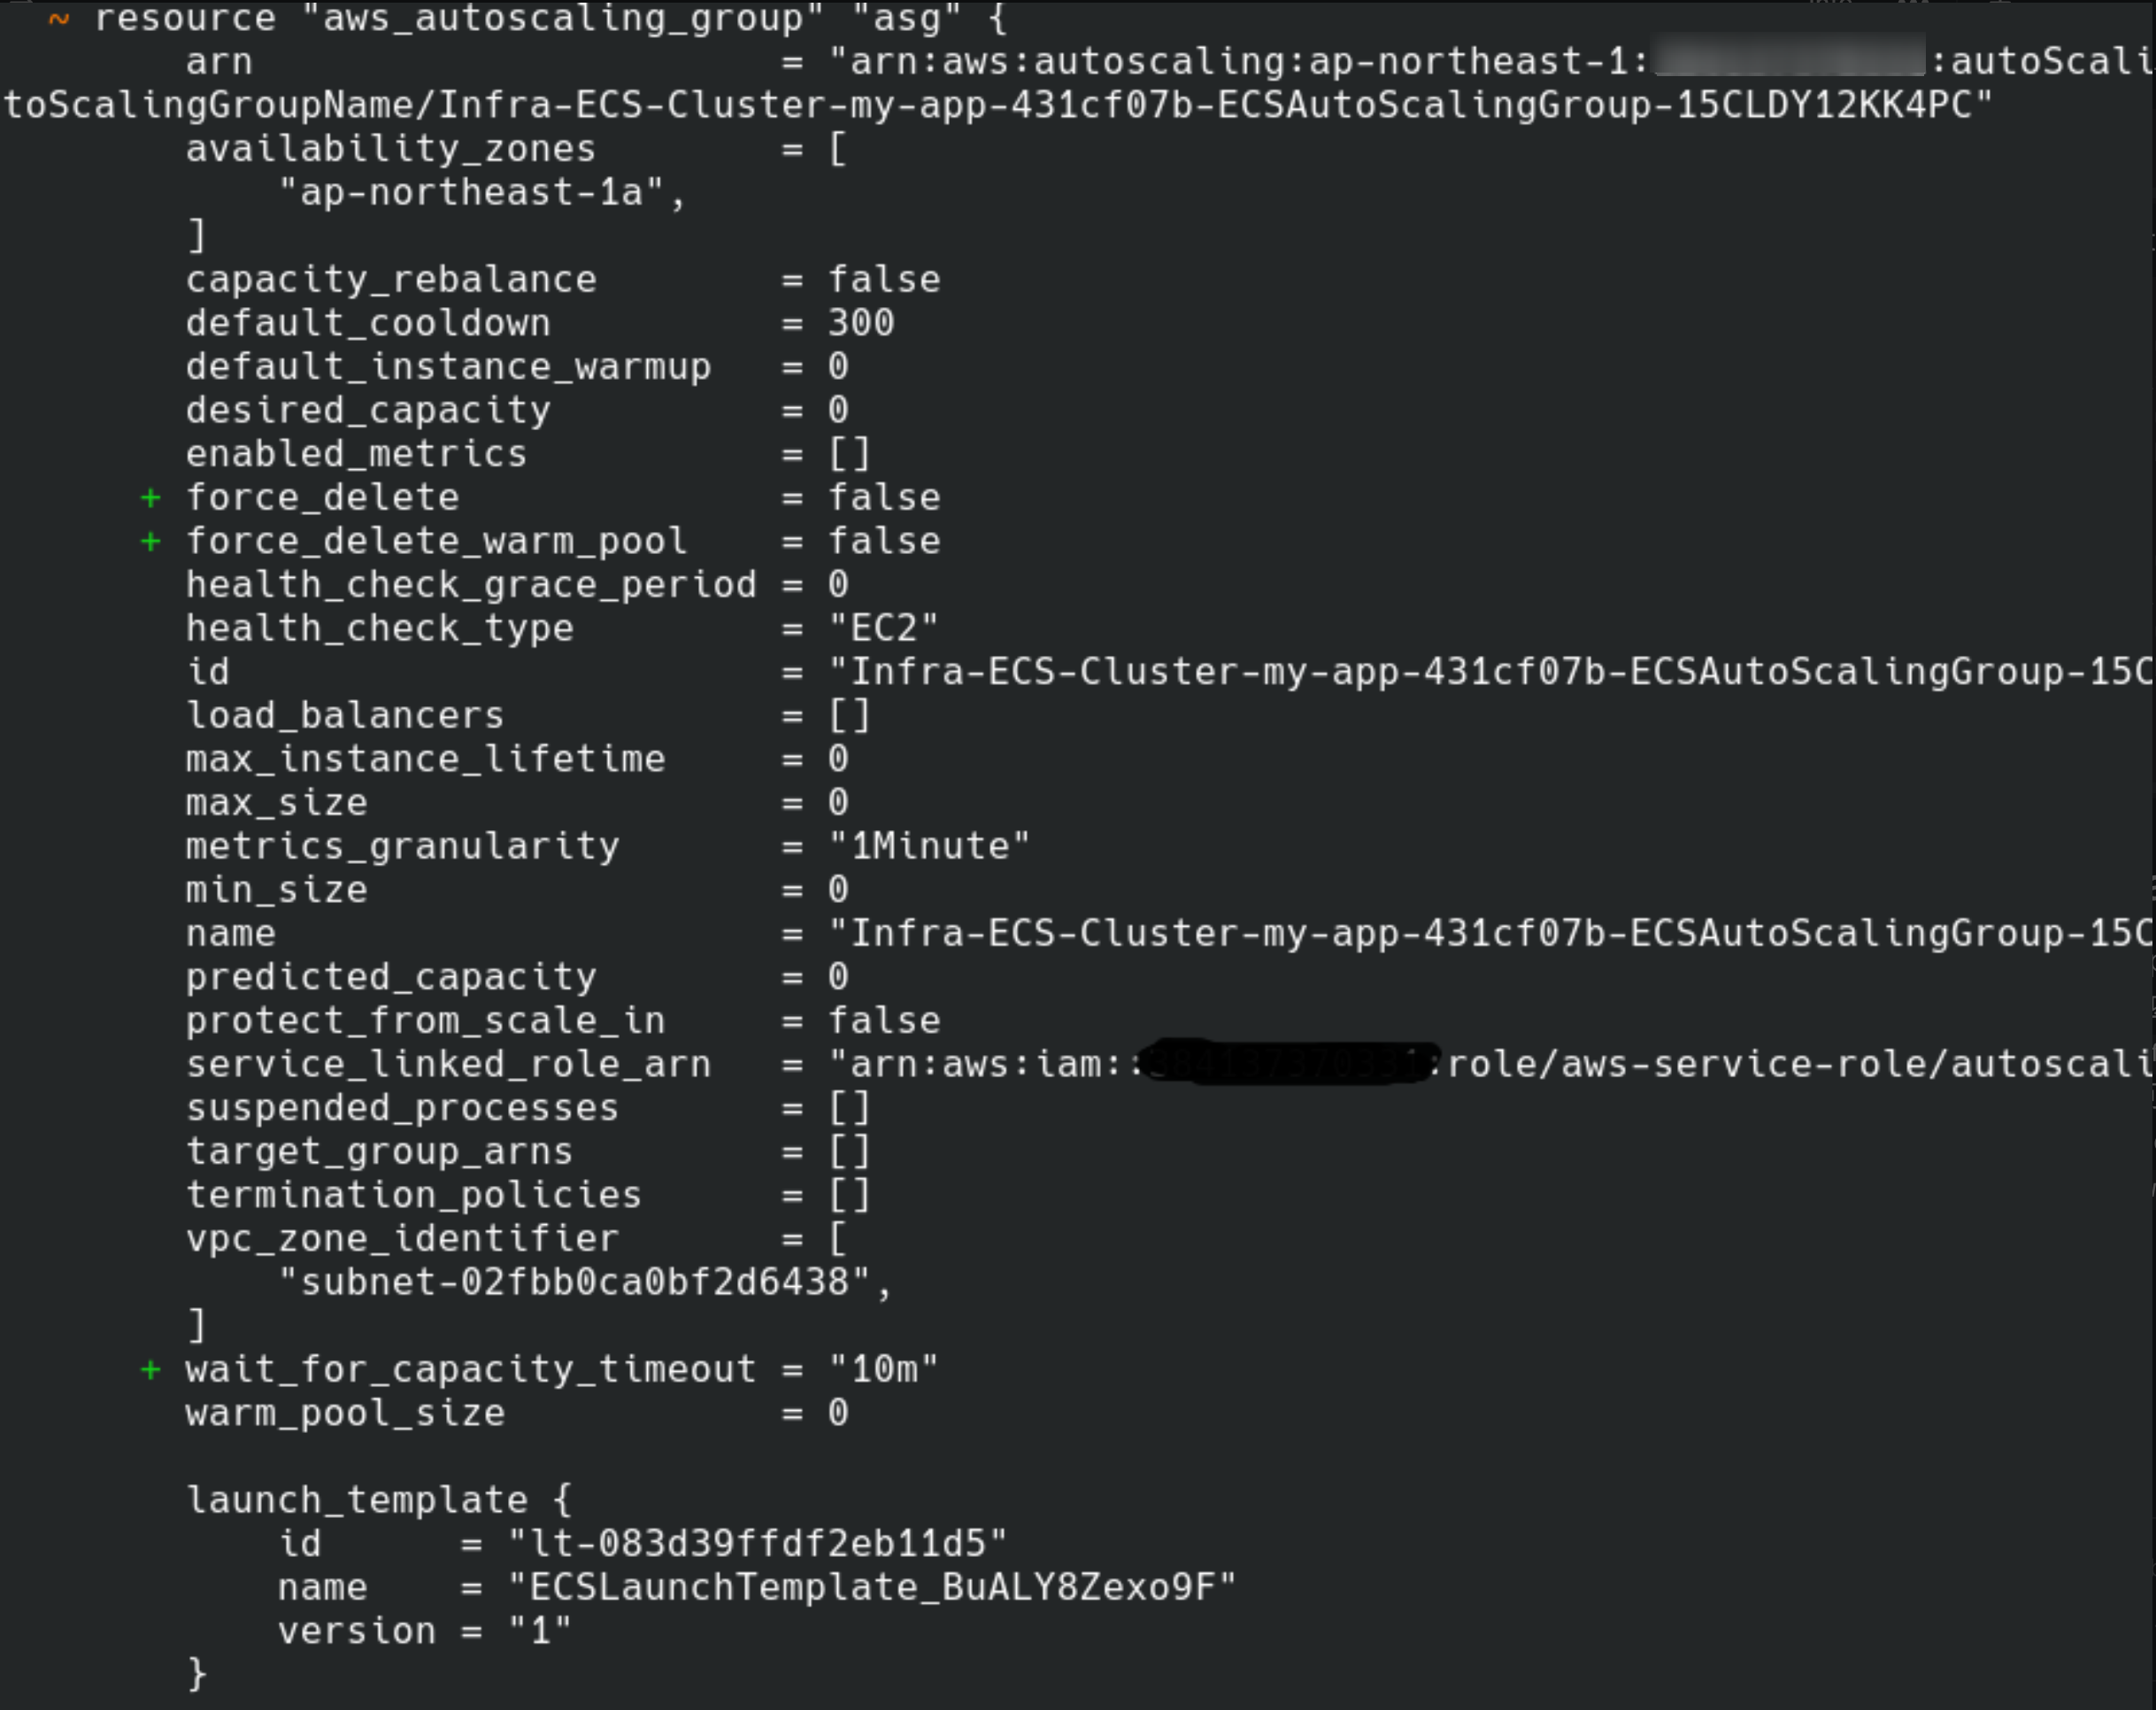
1
2
3
4
5
6
7
8
9
10
11
12
13
14
15
16
17
18
19
20
21
22
23
24
25
26
27
28
29
30
31
32
33
34
35
36
37
38
39
40
41
42
43
44
45
46
resource "aws_autoscaling_group" "asg" { availability_zones = ["ap-northeast-1a" ] capacity_rebalance = false context = null default_cooldown = 300 default_instance_warmup = 0 desired_capacity = 0 desired_capacity_type = null enabled_metrics = [] force_delete = null force_delete_warm_pool = null health_check_grace_period = 0 health_check_type = "EC2" launch_configuration = null load_balancers = [] max_instance_lifetime = 0 max_size = 0 metrics_granularity = "1Minute" min_elb_capacity = null min_size = 0 name = "Infra-ECS-Cluster-my-app-431cf07b-ECSAutoScalingGroup-15CLDY12KK4PC" name_prefix = null placement_group = null protect_from_scale_in = false service_linked_role_arn = "arn:aws:iam::xxxxxxxx:role/aws-service-role/autoscaling.amazonaws.com/AWSServiceRoleForAutoScaling" suspended_processes = [] target_group_arns = [] termination_policies = [] vpc_zone_identifier = ["subnet-02fbb0ca0bf2d6438" ] wait_for_capacity_timeout = null wait_for_elb_capacity = null launch_template { name = "ECSLaunchTemplate_BuALY8Zexo9F" version = "1" } tag { key = "AmazonECSManaged" propagate_at_launch = true value = "" } tag { key = "Name" propagate_at_launch = true value = "ECS Instance - my-app" } }
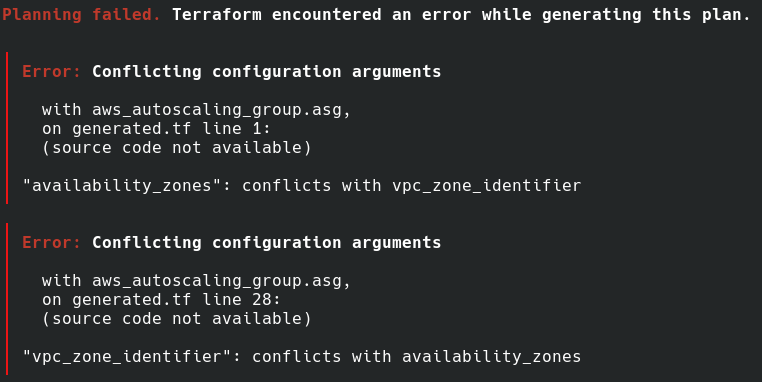
依然有 plan error:
這邊我們移除 availability_zones ,因為之後會想用 vpc_zone_identifier 指定想把 EC2 instance 開在哪些 subnet 裡。
要 import 的時候出現 changes:
terraform 產生的 configuration 參數大多是預設值,目前我們沒有要特別指定這些參數,可以移除、讓它維持是預設值,或者放著也沒關係。有 changes 的時候除非值跟想要的不一樣,不然就讓它 apply 上去,因為通常都是預設值。
這邊我們也把 vpc_zone_identifier 寫死的 subnet id 改成使用 subnet resource:
1 vpc_zone_identifier = [aws_subnet.public_1a.id]
ALB ALB 的 import block:
1
2
3
4
import { to = aws_lb.alb id = "arn:aws:elasticloadbalancing:ap-northeast-1:xxxxxxxx:loadbalancer/app/alb-my-app/84231b29bd347b60" }
ALB 要用 arn 作為 id 來 import,generated configuration:
1
2
3
4
5
6
7
8
9
10
11
12
13
14
15
16
17
18
19
20
21
22
23
24
25
26
27
28
29
30
31
32
33
34
35
36
37
38
39
40
resource "aws_lb" "alb" { customer_owned_ipv4_pool = null desync_mitigation_mode = "defensive" drop_invalid_header_fields = false enable_cross_zone_load_balancing = true enable_deletion_protection = false enable_http2 = true enable_tls_version_and_cipher_suite_headers = false enable_waf_fail_open = false enable_xff_client_port = false idle_timeout = 60 internal = false ip_address_type = "ipv4" load_balancer_type = "application" name = "alb-my-app" name_prefix = null preserve_host_header = false security_groups = ["sg-0920ca3925dc173a2", "sg-0a0aa94c7998f5849"] subnets = ["subnet-02fbb0ca0bf2d6438", "subnet-0d219822dd60f4f83"] tags = {} tags_all = {} xff_header_processing_mode = "append" access_logs { bucket = "" enabled = false prefix = null } subnet_mapping { allocation_id = null ipv6_address = null private_ipv4_address = null subnet_id = "subnet-02fbb0ca0bf2d6438" } subnet_mapping { allocation_id = null ipv6_address = null private_ipv4_address = null subnet_id = "subnet-0d219822dd60f4f83" } }
一樣把 hard code 的 subnet 跟 security group 改成使用 resource,這個修改跟前面一樣就不貼程式碼了~然後就發現忘記 import security group 了……(import 就是很容易漏掉…)
回頭 import 一下 security group:
1
2
3
4
5
6
7
8
9
10
11
12
13
14
15
16
17
18
19
import { to = aws_security_group.allow_ssh_from_my_ip id = "sg-0b20f1eeb5cb12a4d" } import { to = aws_security_group.allow_mysql id = "sg-0dac0bf7b461f3662" } import { to = aws_security_group.allow_http_from_internet id = "sg-0a0aa94c7998f5849" } import { to = aws_security_group.default id = "sg-0920ca3925dc173a2" }
generated configuration 以其中一個 security group 示意:
1
2
3
4
5
6
7
8
9
10
11
12
13
14
15
16
17
18
19
20
21
22
23
24
25
26
27
28
29
30
31
resource "aws_security_group" "allow_http_from_internet" { description = "allow http from internet" egress = [{ cidr_blocks = ["0.0.0.0/0"] description = "" from_port = 0 ipv6_cidr_blocks = [] prefix_list_ids = [] protocol = "-1" security_groups = [] self = false to_port = 0 }] ingress = [{ cidr_blocks = ["0.0.0.0/0"] description = "" from_port = 80 ipv6_cidr_blocks = [] prefix_list_ids = [] protocol = "tcp" security_groups = [] self = false to_port = 80 }] name = "allow-http-from-internet" name_prefix = null revoke_rules_on_delete = null tags = {} tags_all = {} vpc_id = "vpc-04828d35609756ab9" }
跟前面一樣,我們要把寫死的 vpc id 改成使用 resource。之後這樣的修改不再繼續碎碎唸了,詳細可以看 Gitlab 。
回到 ALB,還有 target group 跟 listener 要 import,target group 的 import block:
1
2
3
4
import { to = aws_lb_target_group.tg id = "arn:aws:elasticloadbalancing:ap-northeast-1:xxxxxxx:targetgroup/tg-my-app/8b85ca755abbba68" }
generated configuration:
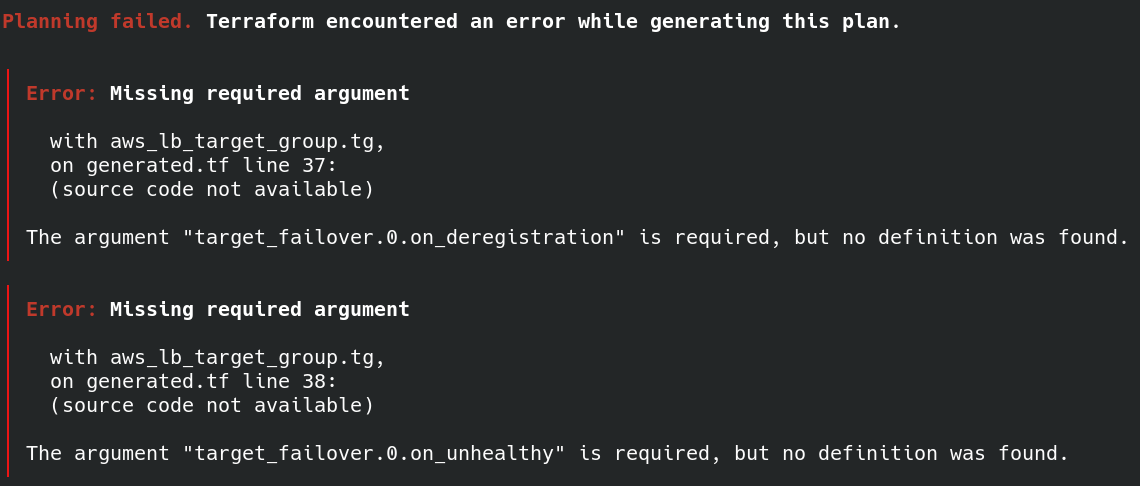
1
2
3
4
5
6
7
8
9
10
11
12
13
14
15
16
17
18
19
20
21
22
23
24
25
26
27
28
29
30
31
32
33
34
35
36
37
38
39
40
41
resource "aws_lb_target_group" "tg" { connection_termination = null deregistration_delay = "300" ip_address_type = "ipv4" lambda_multi_value_headers_enabled = null load_balancing_algorithm_type = "round_robin" load_balancing_cross_zone_enabled = "use_load_balancer_configuration" name = "tg-my-app" name_prefix = null port = 80 preserve_client_ip = null protocol = "HTTP" protocol_version = "HTTP1" proxy_protocol_v2 = null slow_start = 0 tags = {} tags_all = {} target_type = "instance" vpc_id = "vpc-04828d35609756ab9" health_check { enabled = true healthy_threshold = 5 interval = 30 matcher = "200" path = "/" port = "traffic-port" protocol = "HTTP" timeout = 5 unhealthy_threshold = 2 } stickiness { cookie_duration = 86400 cookie_name = null enabled = false type = "lb_cookie" } target_failover { on_deregistration = null on_unhealthy = null } }
出現的 error:
沒有特別要設定 target_failover ,所以把整個 block 刪除。
ALB listener 的 import block:
1
2
3
4
import { to = aws_lb_listener.http id = "arn:aws:elasticloadbalancing:ap-northeast-1:xxxxxxx:listener/app/alb-my-app/84231b29bd347b60/77beb4d32375d613" }
generated configuration:
1
2
3
4
5
6
7
8
9
10
11
12
13
14
15
resource "aws_lb_listener" "http" { alpn_policy = null certificate_arn = null load_balancer_arn = "arn:aws:elasticloadbalancing:ap-northeast-1:xxxxxxxx:loadbalancer/app/alb-my-app/84231b29bd347b60" port = 80 protocol = "HTTP" ssl_policy = null tags = {} tags_all = {} default_action { order = 0 target_group_arn = "arn:aws:elasticloadbalancing:ap-northeast-1:xxxxxxx:targetgroup/tg-my-app/8b85ca755abbba68" type = "forward" } }
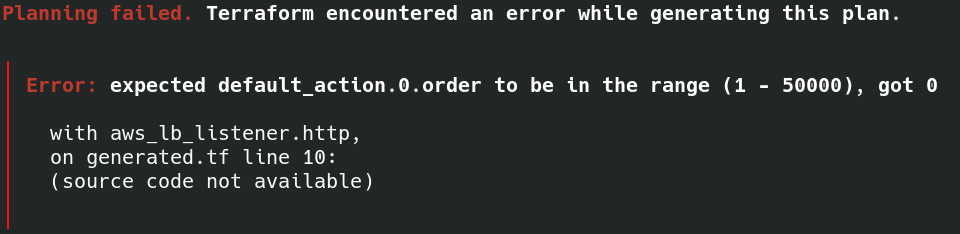
遭遇 error:
直接把 default_action 裡的 order 砍了。
終於把 compute 的 resource import 完了,這就是 devops 樸實無華的生活……(逐漸沒有靈魂